December 17, 2010

Jackets I've Made

I am on a quest for the perfect jacket pattern to fit my body. I own seventeen patterns, only 3 of which I've actually made.


This was my first attempt at a sweatshirt jacket, from this book. These jackets, made by disassembling a store-bought sweatshirt, quilting the pieces and reassembling it, are everywhere in the quilting world. Most of them are pretty frumpy, but I thought the patterns in this book were cuter and more modern.  Overall the process was pretty simple and straightforward. Unfortunately, I didn't do a muslin run through, and I didn't know enough to alter the pattern to fit my body so I ended up with a jacket that was really cute, but way too narrow to fit my linebacker shoulders. I lengthened the sleeves, but did it at the end of the sleeve instead of higher up the sleeve, so they were also too snug in the forearms. Fortunately it fits my sister, who is its proud owner. I think if I do this again, it will be a very different process.


This is an unlined jacket I made from this pattern. The fabrics are from the floragraphix collections, leftover from a quilt I made for my sister and brother-in-law.  I wear this occasionally. It's really big on me.  I definitely need to do some refining to the fit. It's made to be oversized but it's really huge. Maybe I just need to make a size down (could it be that easy?).


This is a jacket I made. I used this basic kimono vest pattern but I added sleeves. I used an organdy that was already embellished with ribbon for the body (no I did not sew all that down myself, lol).  I really like the pleated styles that I'm seeing everywhere right now, so I tried my hand at making pleats along the facing.  I used all kinds of scraps in black and white and I love the way it turned out.  I am going to add a binding along the sleeve and hem edges to finish it up, in time to be in the quilt show in March.

My latest endeavor is making this pattern.  A member of my guild made this and I fell in love with it. It is about half way complete, and has been for months, patiently waiting in a plastic bag for me to get my act together. Can I finish it in time to wear it in the spring?

November 8, 2010

Scarves

I love scarves. I love that scarves are totally in fashion right now. I've always been a bit intimidated by wearing them.  I grew up in Louisiana where it was rarely cold enough to wear winter clothing. The climate I live in now (near Washington DC) is perfect for a cozy scarf, so I've been looking for ideas for making them and wearing them.

Scarves are not just utilitarian. I think scarves can really add to an outfit.  It's a great way to add an accent color or pattern or texture to wardrobe basics.

Scarves can also flatter! They can create that deep V-neckline that is so flattering, or they can cover a not-so-young neckline.  They can substitute for jewelry and draw attention up to your face.

I started by doing an inventory of what I already own.  I have a lot of silk and silk-like scarves. They're a nice, light accent to an outfit, but not particularly warm.  I think of wearing them more in the springtime, especially since I have mostly spring colors in my collection.


I have lots of knitted and crocheted scarves, too.  They are warm, but I find most of them itchy and too bulky for all but the coldest weather.


When I saw a tutorial for a flannel scarf, I thought it was a brilliant idea! Flannel pajamas are about the most comfortable thing in the universe, and the idea of something that feels like that wrapped around my neck on a cool windy day sounds like heaven.  They are so simple to sew, they work up much faster than a knitted or crocheted scarf, plus the flannel is generally cheaper to buy than nice quality yarn.

Of course, I ran straight to Joann's and bought some flannel. There are some really neat prints available these days, not just solids, or juvenile prints for a nursery.  Here are the two scarves I made.


I'm obsessed with ruffles and pleats right now, so I added ruffles to both of mine.  I made the blue floral one to go with jeans, denim jackets, and the loads of red and burgundy I have in my closet.

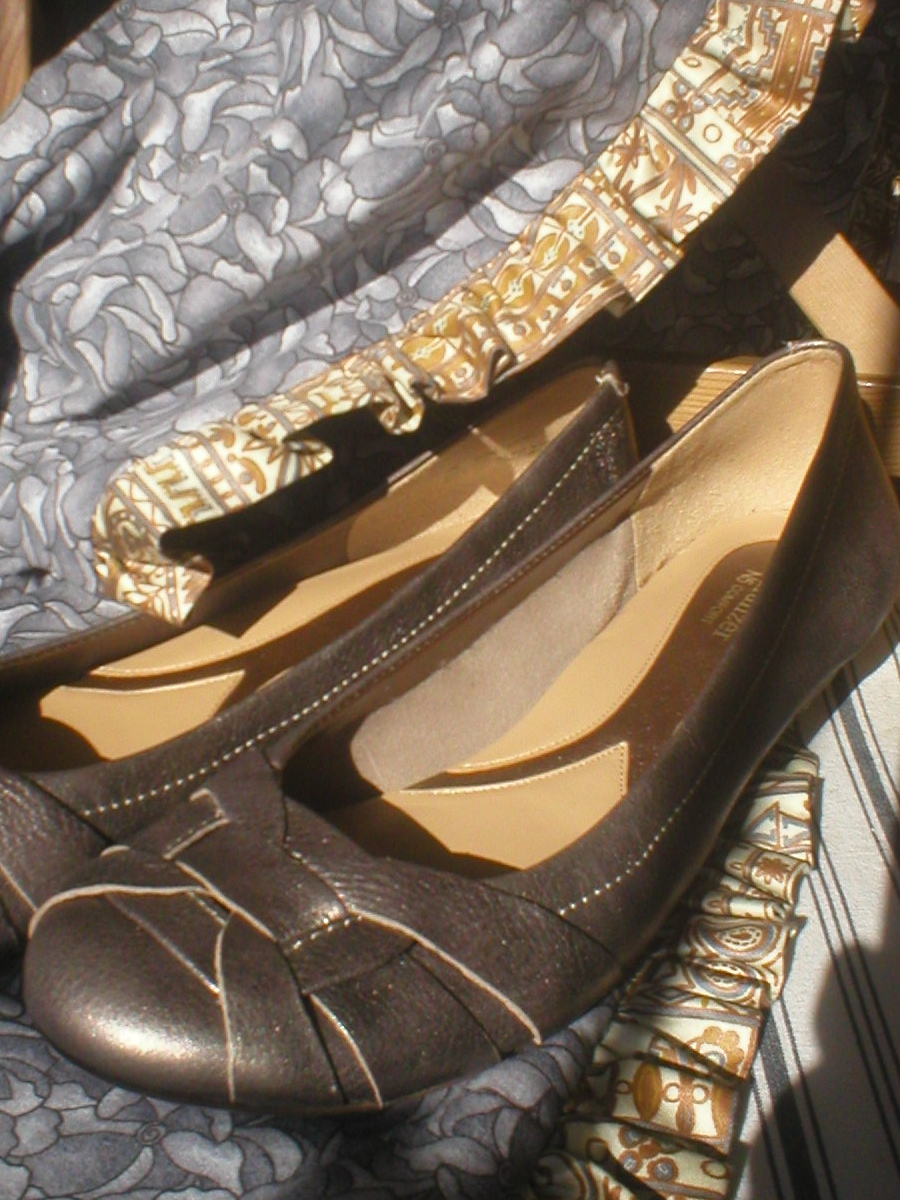
I made the silver and gold one to coordinate with the new pair of metallic flats I just bought.  Metallic shoes are very "out there" for me, but I'm told that metallics are neutrals.


Here are some tutorials for this super-simple sewing project. 
Make it and Love it's Gathered Flannel Scarf
luvinthemommyhood's Infinity and Beyond Scarf
Modern Organic Fabric's Easy Ruffle Trim Scarf

With the holidays coming up, these make great gifts that work up very quickly and easily.

October 26, 2010

Review: Threads Fitting DVD Series

My local library has this set of four videos so I decided to check them out. I'm such a visual learner that I need to see really great photos or illustrations of a process, or even better a live demonstration!

I found watching these videos extremely helpful. The presenters are a bit wooden but very knowledgeable. I really appreciated seeing how the process of how to cut a paper pattern.  How to pin a muslin mock-up and how to transfer those changes to the paper pattern was also very helpful.  Also, just seeing examples of poor fit on a live model helped me to discern what problems I have with fit.

So I highly recommend this set of videos.  They will be going on my amazon wish list for Christmas for sure.

October 19, 2010

Pretty in Pink

Oh Molly Ringwald, How I wanted to be you when I grew up.
I can't believe I've seen Sixteen Candles approximately 11, 567 times, but I survived to the ripe old age of 36 without seeing Pretty in Pink.

So last weekend, it came on television and I watched it.

There were so many things I enjoyed about this movie. Annie Potts dressed as a punk rocker....Duckie's remarkable fashion choices... Andrew McCarthy's blue eyes.

It seemed so apropos, since I'm doing this redux blog. Molly's character was the original wardrobe reduxer!  I was hanging on the edge of my seat to see what she's do to combine those two pink gowns, one from her dad, and one from her friend, into a new fabulous prom dress.

I was sorely disappointed when this walked out. Not what I would have done, even in 1985.  But what a fun movie!


Jeans Completed

So I decided I really didn't want to draw attention to the hem of the pants, so I went a different direction. I decided to use a decorative stitch on my machine to cover the faded mark from the previous hem.

I started with a sample on an old piece of muslin. Unless I'm just playing around, I always make a little sample. It is important to test your thread tension, stitch length, etc.

I also changed the needle on my machine. I just learned about Universal needles and how they were made to be used on both cotton fabrics and knits.  So I put in a Universal needle, in a size smaller than I usually use.


I used a dark navy blue thread.  I thought I might need a stabilizer, but these jeans are quite sturdy and elastic. I tried the decorative stitch on the very bottom of the jeans first, which ended up being folded up into the final hem.

Here is a comparison between the jeans before the stitch (L) and after (R).
The trickiest part of this process was not catching the underside of the pants while sewing.

For the final hem, I folded the raw edge under 1/4", then folded it in again 1/4" and pressed it with a hot iron.  Instead of using my sewing machine's blind hem stitch, I just sewed a straight stitch with the wrong side of jeans turned out so I could go along the edge of the turned under seam.

While I was reduxing these jeans, I wanted to fix one more issue.  I bought them with this strange button closure on the back, between the back belt loops. I guess you could use it to adjust the waist, but I didn't need it. It just made a wierd lump on my back. So I took it off!

The trusty seam ripper to  the rescue again!

Here's the finished product! You can see in the background that my hubby was watching The Incredible Hulk, when I interrupted him to take photos!

October 5, 2010

Hem: Auditioning Possibilities

I washed the jeans with the hopes that the old hemlines would relax a bit. I was disappointed to see that they did not relax at all. So I ironed them on high heat with steam and some starch alternative.


I love this product! It's so much less sticky than spray starch and it smells nice.

I went through my bin of trims. I didn't find a lot of possibilities (Christmas ribbon and rick rack wasn't doing it for me) but I did find a few.


For some reason, this reads "tennis" to me. Perhaps with something else, as an edging?
This was a belt from something....It reads a bit too "sailor suit" for my taste. Shirley Temple, I am not.

So I decided to audition a few fabrics from my quilting stash.
 
 Boring....
 I think the scale is too big on this one.


These two photos are the same fabric, just folded differently for different effects.
Maybe an autumn feeling?


Nah, but this print did make me think of a technique. It's a quilting technique but it would be really interesting. French braids!

I could use lots of interesting fabrics together and not be limited to just one. I hate having to choose just one of anything!

I shall have to choose carefully though. I could see how this look could quickly become too "hippy chick." Not that there's anything wrong with hippy chicks, I just don't care to dress like one.

October 4, 2010

My First Project: Altering a Hem

It's the curse of the tall woman: I had a pair of wide leg jeans in my closet that I never really wore because they were too short.


I have a bit of experience hemming things, from sewing a few garments.  So how hard can it be to rehem a pair of pants? Ok, they're not trousers. They're stretch denim jeans. But it still can't be that hard, right?
After a bit of examination, I can see that ripping out the hem seam will be a relatively simple process. The hardest problem is the very stretchy, thick elastic thread. I pull out my handy, dandy seam ripper. Do you own one of these? If not, you should.

All I did was run that bad boy around the whole hemline until all the stitches were loose.
So here they are, with the hem let out completely.  This adds about five inches of total length, more than enough to make them non-high-waters!

But look at that lovely line where the previous hem was turned and pressed . Hmmm, how to hide that? I will have to consider. Trim? Fabric ink or paint? Permanent marker?

Next installment: Putting in a new hem.

Book Review: The Science of Sexy by Bradley Bayou

I'm starting my fashion research at the same place I start all my research: my local public library!

There isn't much "science" in this book. The subtitle is more honest: "Dress to fit your unique figure with the style system that works for every shape and size." After a short introduction which includes Mr. Bayou's "Conceal and Reveal" strategy, and his "Ten Dress Sexy Commandments," I was instructed to take my measurements and refer to a chart for my color. My measurements gave me my body shape, and the color chart referenced my height and weight. I was sent to a "fitting room" in the back of the book, taking my height, weight, and body shape into consideration.

I am a "Tall Plus Rectangle." I have a thick waist (all those post babies pounds), but at least my broad shoulders and wide hips are balanced. I am supposed to wear clothes that create the illusion of a slimmer waist, like wrap shirts and dresses, surplice tops, v-necks, and boatneck tops. I should wear empire waists, and avoid drop waists. I should wear slightly flared skirts and straight or bootleg pants. I should keep my patterns and accessories in a medium to large scale. I can show off my legs. I should wear pointy toed shoes, peep toe heels, and no squared toed shoes. I should choose princess seamed jackets, and avoid doubled breasted anything, long, straight coats, and anything that is shiny, stretchy, or clingy around my middle. I should also avoid belts. Which is good to know, since I'd been looking around for belts lately!

I didn't learn much that I didn't already know. I need to remember not to wear clingy t-shirts without a jacket, as this emphasizes that spare tire around my middle. I need to invest in some new shoes this winter, so I will try to follow Mr. Bayou's recommendations on that point.

September 29, 2010

Misnomer?

I should probably also subtitle this blog "Adventures in Designing a Blog," because, seriously, I have no clue what I'm doing.

So why should you come back to this blog? I'm going to be performing some experiments, perhaps even surgery, on my wardrobe.

I am 36 years old. I am a stay-at-home, homeschooling mom. I am also an artist and I am really, really tired of my boring closet. I want to pin down my personal style, and create some really interesting items of clothing. I'm not a boring person, and I'm tired of dressing like one. But I am somewhat moderate in my tastes. I don't want to dress like a goth or a steampunk. I want beautiful, elegant, upscale, one of a kind, artistic designer clothes.

But this is not What Not to Wear. I have no Visa with $5000 to blow in NYC. In fact, I have basically no budget for this project. I do have tons of fabric from my quilting and sewing stash. I have quite a few interesting trims and embellishments that I have acquired over the years. I have fabric paint and ink and stencils. I have a lot of time, skills, knowledge, and some serious motivation.

I have also have quite a few items in my closet that are either a bit too big or a bit too small. One of my goals is to learn to alter my clothing to fit my body.